Introduction
If you are looking for a fun and easy DIY, have I got the project for you! This Wooden “LOVE” banner is the perfect way to add a bit of rustic charm to your Valentine’s decor. This project is a great beginner project for laser cutting crafts!
To do this project, you will first want to snag the free cut file I have linked here: Love Banner Zipped File
Side note: No laser cutter? No worries! The provided SVG file can easily be uploaded to use with paper cutting machines such as Cricut or Silhouette. I’ve even provided a PDF version that you can easily print and cut for a quick project!
Materials
- Banner Pieces (I cut mine using my Glowforge Aura!)
- Twine, Ribbon, or String
- 1/8 inch Wood (I typically use Walnut or Baltic Birch plywood or MDF)
- Paint, Wood Stain, or Markers (optional)
- Glue
- Sandpaper
- Paint brushes or sponges (optional)
- Beads, tassels, or other embellishments (optional)
Step-by-Step Instructions
Step 1: Cut Your Pieces
Start by cutting your banner pieces. On my files, I use black to indicate cut lines, red for engraving, and green for scoring. In the example here, you’ll see that the banner shape is in black and will be cut out, while the heart is in green to indicate this should be scored. The banner file used for this tutorial comes with cutout hearts and letters to glue on top of the scored graphics for perfect placement.

Step 2: Prepare the Pieces
Remove any masking or residue- I find that cleaning my pieces with 70% Isopropyl Alcohol works very well to remove any soot or oily residue from my laser cutting and engraving.
Once you’ve cleaned up your pieces, take some sandpaper to clean up any rough edges. If needed, clean with the alcohol again.
Step 3: Lay out and Decorate the Banner Pieces

If painting or staining, go ahead and apply a base layer. Let this dry completely.
I did not stain or paint in my example, because I used 2 types of wood- Baltic Birch and Walnut. I really loved the natural colors and decided to just use the pieces as is for my banner.
Step 4: Glue the Pieces Together

Apply a thin layer of glue to the backs of the small pieces (I just used Gorilla Glue, but any super glue should be fine).

Carefully place the small pieces to the scored banner pieces. The scored lines will be hidden by the top layer when finished. This technique gives a lovely 3D effect to an otherwise simple banner.
Allow the glue to dry completely before moving on to the next step.
Step 5: Assemble the Banner

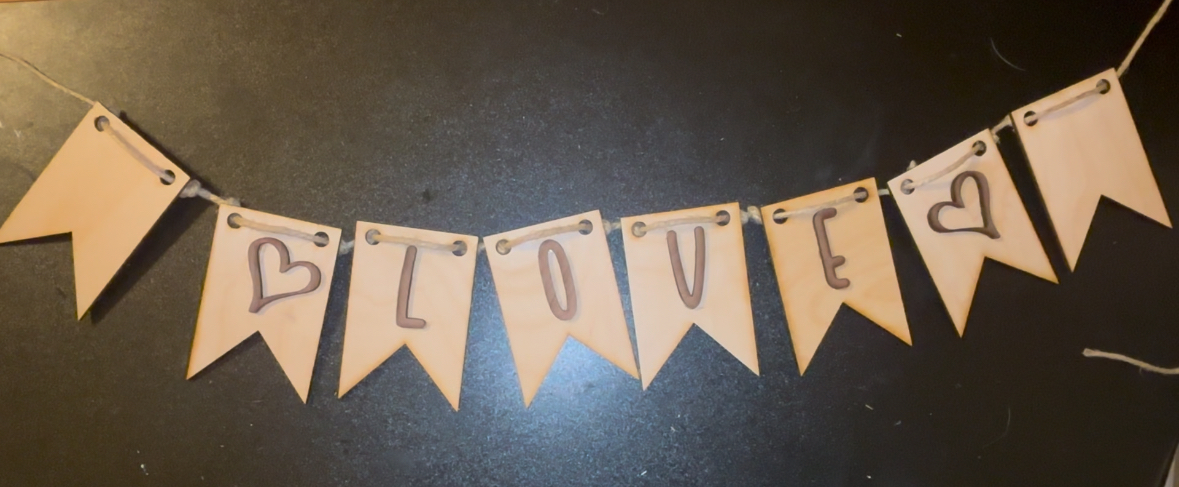
Take your twine, ribbon, or string and measure out a generous amount. I laid my pieces out and then pulled enough twine to give myself about 6 inches extra on either side, then I doubled the amount and cut. The reason I decided to do this was because I wanted to tie knots to keep my pieces in place and I wanted to be sure I had plenty to work with.

I started by tying a knot and then threading the banner piece onto the twine. I then tied a second knot to help hold the piece into place. I then moved about a finger width over and tied my next knot and added another piece. I just kept this pattern going until everything was in place.
If you wanted to be a bit fancier, you could use wooden beads between each piece to keep the spacing consistent. If you want to be able to move the pieces around, just skip the knot tying.
Step 6: Hang and Enjoy!

Display your finished banner!
Final Tips
This simple banner can be such a versatile project! You could cut the pieces from acrylic for a different look or paint the banner. You could also use scrapbook paper and Mod Podge to put a unique pattern onto each banner piece before gluing your letters on. There are a ton of possibilities!
If you make your own version of this project, I’d love to see it! Be sure to tag me @emeedeecreates!